3 Ocak 2013 Perşembe

Old Milwaukee Rye Bread

To contact us Click HERE

     I was introducedto this bread by Rethie Foster when I interviewed her for my February 2002cooking column for the Abilene Reflector-Chronicle. Here’s what I said in therecipe header, Thisis a somewhat complicated recipe but well worth the effort!  It belongs in the 'sourdough' category andbegins with an old-fashioned sponge starter. Rethie discovered this bread inthe newspaper and it became a favorite.”     She was just thefifth cook that I had inteviewed and she shared wonderful recipes. As a matterof fact, her collection of recipes is still available in the first edition ofthe Heritage Society’s Home Cooking, Dickinson Country Style
Old Milwaukee Rye Bread   Yield:  4 loavesSponge for RyeBread -- prepare this inadvance to use in the recipe that follows1 (¼ oz.) pkg. activedry yeast yeast (or 1 scant tablespoon)1½ cups warm water 2 cups rye flour1 teaspoon carawayseed  (Iomit)
1.     Combine the yeast and water in a largebowl. 2.     Stir to dissolve.  Add the flour and caraway seeds and stir toblend.  3.     Cover lightly with plastic wrap.
This is what the starter looks like.
Although the spongeis usable after six hours, it is best left to stand from one to three days atroom temperature. Three days will give a more sour taste, which many peopleprefer.
Rye Bread1  recipe sponge for rye bread (above)1  (¼ oz.)pkg. active dry yeast yeast (or 1scant tablespoon)1  cup warm water (about 105° to 115°)¼  cup all-natural dark molasses2 tablespoons carawayseeds, divided (I just use enough tosprinkle on top of the loaves right before baking)1 lightly beaten egg1  tablespoon salt1 cup rye flour3  tablespoons solid white shorteningAbout 5 to 5½ cupsall-purpose flour*1 beaten egg and 1tablespoon milk for brushing top of loaves
1.     Stir down the sponge. 2.     Dissolve yeast in the water.
The development of bubbles in the yeast mixture indicates that is has been activated.
3.      Add the yeast to the sponge, stirring.  4.     Add the molasses and half the carawayseeds. Stir to blend.  5.     Add the lightly beaten egg and salt andblend once more.  Add the rye flour andblend.6.     Add the shortening and beat toblend. 

7.     Add 2 cups of all-purpose flour and blendwith a wooden spoon. (Or, mix with thepaddle attachment of a counter-style mixer.)8.     Gradually add 2 more cups, kneadingconstantly. (I continue to use the paddleattachment of the mixer during this step.)

9.     Add more flour, about 2 tablespoons at atime, until the dough has a proper pliable and workable consistency (it shouldlose it’s stickiness but not be dry). Turn the dough out onto a lightly flouredboard and continue kneading about 6 minutes or longer. Knead and beat doughabout 10 minutes. When ready, dough should weigh about 3½ pounds. (I insert the kneading attachment rightbefore beginning this step.)
The kneaded dough has pulled away from the sides of the bowl .
10.  Let warm water flow into a large bowluntil bowl is heated. Drain, dry and grease the bowl with shortening (or drizzle bowl lightly with vegetableoil).  Shape the dough into a balland add it to the bowl. Cover lightly with plastic wrap.  et aside to let rise one hour or until doublein bulk. (Note:  To test for double insize . . . Press the tips of 2 fingers lightly and quickly 1/2” into the dough;if the dent stays, it is double.)
Kneaded dough has just  been added to the bowl.
This is what is looks like after an hour!
11.  If long bread tins or molds (such asFrench bread molds) are to be used, grease them (or spray).  Otherwise, use aTeflon baking sheet, ungreased.12.  Divide the dough into four parts of equalweight. Roll each piece into a long sausage shape with the palms of the hand. Theshapes should be about 15 or 16 inches long. Place in molds, or on baking sheet, and cover loosely with wax paper andset aside to rise about an hour or until double in bulk. 
Loaves have just been added to the bread pans.
13.  Meanwhile, preheat the oven to 375°.  14.  Using a sharp blade, make severaldiagonal gashes on top of each loaf. Brush tops with egg beaten with milk. Sprinkle with remaining caraway seeds. 
Slashing the raised dough helps control splitting during the baking process.
15.  Place in the oven and bake about 40minutes or until crisp crusted and baked through.  (Note: When the baking time is up, remove oneloaf and tap the bottom or sides; if done, it should sound hollow.)

*Flour amounts varydue to weather conditions. In very humid weather, yeast recipes often requiremore flour because the extra moisture in the air keeps the dough soft. Theprotein content of the flour can cause variables.
Recipe without photos:Old Milwaukee Rye Bread   Yield:  4 loavesSponge for RyeBread -- prepare this inadvance to use in the recipe that follows1 (¼ oz.) pkg. activedry yeast yeast (or 1 scant tablespoon)1½ cups warm water 2 cups rye flour1 teaspoon carawayseed  (Iomit)
1.     Combine the yeast and water in a largebowl. 2.     Stir to dissolve.  Add the flour and caraway seeds and stir toblend.  3.     Cover lightly with plastic wrap.Although the spongeis usable after six hours, it is best left to stand from one to three days atroom temperature. Three days will give a more sour taste, which many peopleprefer.
Rye Bread1  recipe sponge for rye bread (above)1  (¼ oz.)pkg. active dry yeast yeast (or 1scant tablespoon)1  cup warm water (about 105° to 115°)¼  cup all-natural dark molasses2 tablespoons carawayseeds, divided (I just use enough tosprinkle on top of the loaves right before baking)1 lightly beaten egg1  tablespoon salt1 cup rye flour3  tablespoons solid white shorteningAbout 5 to 5½ cupsall-purpose flour*1 beaten egg and 1tablespoon milk for brushing top of loaves
1.     Stir down the sponge. 2.     Dissolve yeast in the water. 3.      Add the yeast to the sponge, stirring.  4.     Add the molasses and half the carawayseeds. Stir to blend.  5.     Add the lightly beaten egg and salt andblend once more.  Add the rye flour andblend.6.     Add the shortening and beat toblend.  7.     Add 2 cups of all-purpose flour and blendwith a wooden spoon. (Or, mix with thepaddle attachment of a counter-style mixer.)8.     Gradually add 2 more cups, kneadingconstantly. (I continue to use the paddleattachment of the mixer during this step.)9.     Add more flour, about 2 tablespoons at atime, until the dough has a proper pliable and workable consistency (it shouldlose it’s stickiness but not be dry). Turn the dough out onto a lightly flouredboard and continue kneading about 6 minutes or longer. Knead and beat doughabout 10 minutes. When ready, dough should weigh about 3½ pounds. (I insert the kneading attachment rightbefore beginning this step.)10.  Let warm water flow into a large bowluntil bowl is heated. Drain, dry and grease the bowl with shortening (or drizzle bowl lightly with vegetableoil).  Shape the dough into a balland add it to the bowl. Cover lightly with plastic wrap.  et aside to let rise one hour or until doublein bulk. (Note:  To test for double insize . . . Press the tips of 2 fingers lightly and quickly 1/2” into the dough;if the dent stays, it is double.)11.  If long bread tins or molds (such asFrench bread molds) are to be used, grease them (or spray).  Otherwise, use aTeflon baking sheet, ungreased.12.  Divide the dough into four parts of equalweight. Roll each piece into a long sausage shape with the palms of the hand. Theshapes should be about 15 or 16 inches long. Place in molds, or on baking sheet, and cover loosely with wax paper andset aside to rise about an hour or until double in bulk.  13.  Meanwhile, preheat the oven to 375°.  14.  Using a sharp blade, make severaldiagonal gashes on top of each loaf. Brush tops with egg beaten with milk. Sprinkle with remaining caraway seeds. 15.  Place in the oven and bake about 40minutes or until crisp crusted and baked through.  (Note: When the baking time is up, remove oneloaf and tap the bottom or sides; if done, it should sound hollow.)
*Flour amounts varydue to weather conditions. In very humid weather, yeast recipes often requiremore flour because the extra moisture in the air keeps the dough soft. Theprotein content of the flour can cause variables.

Cinnamon Popcorn — Gifts From the Kitchen

To contact us Click HERE

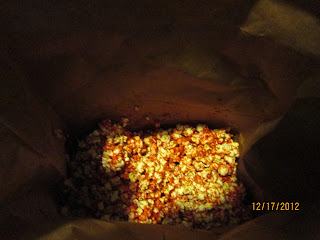
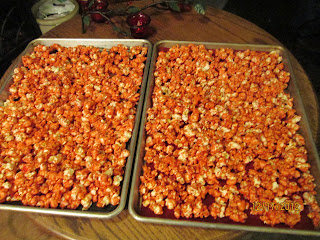
    The elves have been busy making Christmaspopcorn . . . or maybe it was a few of the nutcrackers that seem to invade our house each holiday season. Nevertheless, sacks of cinnamon popcorn are now ready for delivery. And, the little helpers even attachedrecipes to the sacks! Just wished that they had washed the dishes when theywere through!     The recipe comes from Betty Krenger. It,along with lots of her other wonderful recipes, are included in the 3rdedition (2003-04) of the Heritage Society’s HomeCooking, Dickinson County Style.     I just can't help it! Every time I make candy I am reminded of the food science class I used to teach. For example . . . the corn syrup and baking soda act as interfering agents in this recipe. Corn syrup is high in glucose which helps form small crystals in the final candy solution. Cream of tartar is an acid which can cause the hydrolysis of sucrose creating glucose and fructose (the resulting simple sugars also help form small crystals that create a better mouthfeel). Also the combination of the cream of tartar (acid) and baking soda (base) create the chemical foaming action that changes the cinnamon syrup right before it is poured over the popcorn.  End of lesson . . . for now!
Cinnamon Popcorn  Yield: 4 quarts                      1 cup brown sugar (packed)1/2 to 3/4 cup red hot candies (such as Cinnamon Imperials®) (I use 3/4 cup)1 stick butter (1/2 cup)1/4 cup white corn syrup1/2 teaspoon salt1/2 teaspoon baking soda1/8 teaspoon cream of tartar4 quarts popped corn
1.     Putthe brown sugar, red hots, butter and corn syrup in a microwave safe bowl; cookfor 4 minutes, stirring after each minute. Cook an additional 2 minutes morewithout stirring. Stir in the salt, soda and cream of tartar.
This is what the mixture looks like after the first 2 minutes in the microwave.
This is what it looks like at the end of the first 4 minutes. 
And, this is what it looks like after the last 2 minutes in the microwave.
After the salt, baking soda and cream of tartar go in, the mixture lightens and becomes slightly foamy.
2.     Putpopcorn in a double brown grocery-type bag. Pour hot mixture over corn, stirand then shake well. Put bag in microwave and cook 1-1/2 minutes; remove andshake well. Microwave another 1-1/2 minutes and shake
Popcorn is in the sack after the initial stirring and shaking . . .  ready to go through the
final microwaving process.
3.     Spreadon a cookie sheets to dry. 
4.     Whendry, store in an air-tight container or bag. 

Recipe without photos . . . Cinnamon Popcorn  Yield: 4 quarts                      1 cup brown sugar (packed)1/2 - 3/4 cup red hot candies (such as Cinnamon Imperials®)1 stick butter (1/2 cup)1/4 cup white corn syrup1/2 teaspoon salt1/2 teaspoon baking soda1/8 teaspoon cream of tartar4 quarts popped corn
1.     Putthe brown sugar, red hots, butter and corn syrup in a microwave safe bowl; cookfor 4 minutes, stirring after each minute. Cook an additional 2 minutes morewithout stirring. Stir in the salt, soda and cream of tartar.2.     Putpopcorn in a double brown grocery-type bag. Pour hot mixture over corn, stirand then shake well. Put bag in microwave and cook 1-1/2 minutes; remove andshake well. Microwave another 1-1/2 minutes and shake3.     Spreadon a cookie sheets to dry.  4.     Whendry, store in an air-tight container or bag. 

Slow Cooker Beef, Barley and Mushroom Soup – Assemble it & then Forget It!

To contact us Click HERE

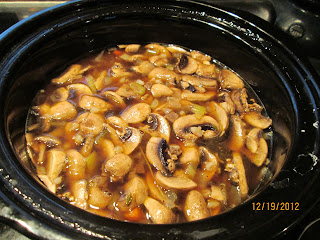
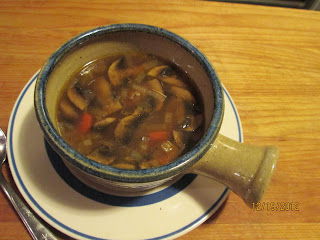
     Not much time for kitchen duties yesterdayso I wanted something I could quickly assemble and put in the slow cooker. Wealso had some leftover roast so this is what I came up with – Slow Cooker Beef,Barley and Mushroom Soup. It was kind of like French onion soup but a lot morehearty!      Note: Since I don’t always have leftoverroast beef on hand, I’ve provided an option for using stew beef. Soup ingredients could also be prepped thenight before, including sautéing veggies and browning raw meat – refrigerateand add all ingredients to slow cooker the next morning.     And finally, it is helpful to rely onproven safety and sanitation practices when creating or adapting recipes forthe slow cooker. I’ve included 11 great tips from the Food Network near thebottom of this post.
Slow Cooker Beef,Barley and Mushroom Soup6 to 8 cups+ beef broth½ cup pearl barley1 bay leafAbout 1 teaspoon dried thymeleaves2 to 3 tablespoons olive oil1 medium onion, diced2 ribs celery, diced2 medium carrots, dicedLeftover roast beef, choppedinto small pieces or 1 lb. lean stew beef, cut into ½” cubes and dredged inflour1 teaspoon garlic powder1 teaspoon Kosher salt, or totastePepper, to taste
1.    Add 6 cups beefbroth, barley, bay leaf and thyme to slow cooker. Turn to low or variablesetting. 2.    Heat olive oil in askillet. Add diced vegetables and sauté. Add to slow cooker.3.    Beef . . .a.    If using stew beef,add additional oil to skillet and brown dredged beef over medium heat. Add toslow cooker.b.    If using leftoverroast, add directly to slow cooker.4.    Add garlic powder,salt and pepper.5.    Cook beef and barleysoup on LOW (or variable) in slow cooker for 6 to 8 hours. 6.    After several hoursthe barley will expand and more broth may need to be added. Also check forseasoning after several hours and add more or refresh seasonings as needed.

Serving Suggestion: Add breadand a fruit salad for a balanced meal.
Eleven Tips for SlowCooker Meals  from the Food NetworkSlow cookers are a wonderful way to make a meal. The key to creating a delicious slow-cooked meal?Knowing the rules. Follow these 11 tips, and you'll be creating warm,hearty recipes all year long:1.    Temperatures mustreach at least 165 degrees Fahrenheit for safe slow cooking. (The low heat onmost models is about 200 degrees F.) 2.    To keep foods outof the food danger zone, always use fully thawed meats. Don't use wholechickens or roasts; cut the meat or poultry into chunks to ensure thoroughcooking. 3.    For best results,a slow cooker should be between half and two thirds full. 4.    Resist temptationto open the lid during the cooking process — each peek you take will add anadditional 15 to 20 minutes of cooking time. Also curb your urge to stir; it'susually not necessary. 5.    Cooking on lowheat takes about twice as long as cooking on high heat. A general rule of thumbis that "low heat" means about 200 degrees and "high heat"is about 300 degrees. 6.    The ceramicinsert in a slow cooker can crack if exposed to abrupt temperature shifts.Don't put a hot ceramic insert directly on a cold counter; always put a dishtowel down first. Likewise, don't put a ceramic insert straight from therefrigerator into a preheated base. 7.    You can certainlyjust pile food into the slow cooker and turn it on, but some recipes come out alot better with a little prep time. Browning meat — especially ground meat —and sautéing vegetables in a skillet before adding them to the slow cooker willgreatly improve the flavor of your meal. If you dredge your meat in a littleflour before browning, you will get a thicker sauce. 8.    For high altitudecooking, add an additional 30 minutes for each hour of time specified in therecipe. Legumes take about twice as long as they would at sea level. 9.    Fat retains heatbetter than water, so fattier foods, like meat, will cook faster than lessfatty foods, like vegetables. For more even cooking, trim excess fat off of meats.If you're cooking a dish with both meat and root vegetables, place thevegetables on the bottom and sides of the insert and put the meat on top. 10.  Dairy products, like sour cream, milk or yogurt, tendto break down in the slow cooker. To prevent this, add them during the last 15minutes of cooking. 11.  If you're adapting a favorite recipe to the slowcooker, there are a few things you should keep in mind:a.    Liquid is notgoing to evaporate, so cut back on the liquids by about 20 percent.b.    If you're using herbs,select whole leaves and spices, and use half the normal amount.c.    If you're usingground herbs, add them in the last hour of cooking.
Recipewithout photos:Slow Cooker Beef,Barley and Mushroom Soup6 to 8 cups+ beef broth½ cup pearl barley1 bay leafAbout 1 teaspoon dried thymeleaves2 to 3 tablespoons olive oil1 medium onion, diced2 ribs celery, diced2 medium carrots, dicedLeftover roast beef, choppedinto small pieces or 1 lb. lean stew beef, cut into ½” cubes and dredged inflour1 teaspoon garlic powder1 teaspoon Kosher salt, or totastePepper, to taste
1.    Add 6 cups beefbroth, barley, bay leaf and thyme to slow cooker. Turn to low or variablesetting. 2.    Heat olive oil in askillet. Add diced vegetables and sauté. Add to slow cooker.3.    Beef . . .a.    If using stew beef,add additional oil to skillet and brown dredged beef over medium heat. Add toslow cooker.b.    If using leftoverroast, add directly to slow cooker.4.    Add garlic powder,salt and pepper.5.    Cook beef and barleysoup on LOW (or variable) in slow cooker for 6 to 8 hours. 6.    After several hoursthe barley will expand and more broth may need to be added.Also check for seasoning after several hours and add moreor refresh seasonings as needed.Serving Suggestion: Add breadand a fruit salad for a balanced meal.