14 Ağustos 2012 Salı

R is for: Red's Java House & Primo Patio Cafe {Restaurant Review}

To contact us Click HERE

In my ongoing quest to cover both sports and food at the same time, I occasionally like to write about some of my favorite places to eat near AT&T Park. This week, I'm excited to tell you about *two* of my favorite little gems that each have their own distinct charm and character.

I'll start with Red's, the tiny little shack of a place that sits below the Bay Bridge on Pier 30. The thing I love most about Red's Java House is what you see is what you get. What you see is a longstanding San Francisco institution that could best be described as a dive bar. What you get is no-frills food, a back patio that sits on the water and cheap beer. And on a sunny San Francisco day before a baseball game (when I'm not working), there's no place I'd rather be. 


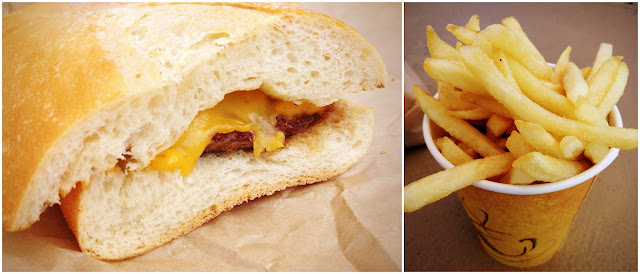
If you're a big lettuce and tomato person, then Red's is not the place for you. They don't have them, so don't ask. Red's cheeseburgers are simply served on a sourdough roll with cheese, pickles and diced onions. I kind of love this about Red's. The bread is a little overpowering, so I would probably recommend a double cheeseburger to compensate. Are there better burgers in the city? Yes. And I've written about them. But none of them come with fries and a beer for around 10 bucks while sitting outside on the water.


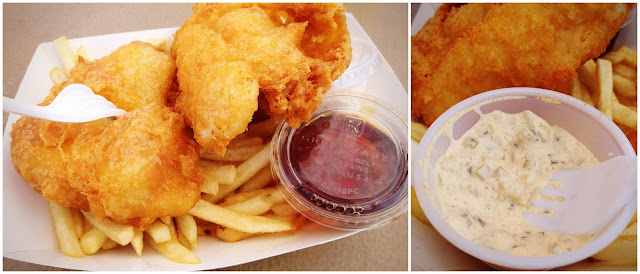
My go-to order is actually the fish and chips, which is vastly underrated at Red's in my opinion. It's a gigantic portion of flakey white fish, battered and fried to a golden brown and served with fries and a side of tartar sauce that I would eat by itself if it was socially acceptable. (OK, maybe I did anyways).


But let's be honest, it's more about the cheap beer and the back patio than anything else. Red's and a Giants game on a sunny San Francisco day...it really doesn't get much better than that.


Over on Townsend is another little hole-in-the-wall place that you might not even notice if you didn't know it was there. Primo Patio Cafe specializes in Caribbean food, and the jerk chicken is what they are known for. As you can see from the photos, you can order it in a variety of ways...as a plate with rice/beans/veggies, as a sandwich, or even on a salad. The chicken is tender and flavorful, and it comes with this pinkish-orangish sauce that is great on the fries as well. I have no idea what's in the primo sauce, but I do know it has just the right amount of tanginess and kick.

On my most recent visit, I actually ordered blackened snapper (but forgot to take a photo...fail). That might be my new sleeper pick for favorite order here. The beers aren't as cheap as Red's, but still very reasonable. My favorite beverage here is actually the "Buli-Buli," pictured above. Mostly, I just really like saying "Buli-Buli," but it's also quite refreshing and tasty. It's beer, lime juice, sugar and ice. (Sort of like Skip 'N Go but without the vodka). Like Red's, (and as the name suggests) Primo Patio Cafe's dining area is outdoors, so it's also great on a sunny day.

What about you? Do Red's and Primo make the cut for YOUR favorite pre-baseball spot to hit up before a Giants' game? Or how about Marlowe? American Grilled Cheese Kitchen? HRD? Tell me what you think in the comments section below!

R is for: Rosemary Chicken Salad Cups

To contact us Click HERE
My original plan was to share with you one of my favorite summer recipes for grilling chicken. But here's the thing. It's not my recipe. I found it on one of the very first food blogs I ever started reading, Kalyn's Kitchen. I discovered her site when I did the South Beach Diet years ago and I still like to get her updates.

Anyways, it's a recipe that calls for a marinade of Dijon mustard, lemon juice, and rosemary (among a few other things). I love it. Like many recipes, I have altered it over the years to suit my tastes. For example, I started using chicken thighs instead of chicken breasts, I often omit the celery seed if I don't have any and I sometimes add a little honey. You should totally check it out.

But this recipe is not for the Rosemary Dijon Chicken....it's for a *chicken salad* you can make with the leftovers (or with any leftover chicken for that matter), and more importantly it includes an adorable way of displaying it.


My leftovers only resulted in a little over a cup of cooked chicken. Feel free to double or triple the recipe if you are cooking for a crowd or have a lot of chicken to use up.


As for what to put in the chicken salad...well, this is a very subjective thing. I love the Chicken Salad with Dried Cherries that I posted in the third week of this blog's existence. But I decided to go with what I had on hand, so I did a combo of rosemary, grapes, green onions, toasted almonds, Dijon mustard, Lemonaise and nonfat Greek yogurt. I seasoned with a little salt and pepper and a pinch of cayenne.


But you know me. I couldn't stop there. I just had to do some cutesy way of displaying it. I spotted a couple of pears laying on my counter and thought they would make *perfect* vessels for the chicken salad. The amount of salad I made would fill 4-5 large pears or apples.


To make the cups, be sure to have a bowl of water mixed with lemon juice on hand (this will help prevent browning). Cut the top off the pears or apples. Squeeze a little lemon juice on the exposed portion. Using a melon baller, quickly hollow out the pear and place in the bowl of lemon water. If fruit does not sit upright, cut off a small portion on the bottom as well (and coat with lemon juice).


When ready to serve, scoop chicken salad into the "cups" and place on a platter lined with butter lettuce and garnish with a rosemary sprig. (Wouldn't these be perfect for a bridal or baby shower?!?) Who knew leftovers could be so fun?

Rosemary Chicken Salad Cups
by Jaymee SirePrep Time: 20 minutesKeywords: salad gluten-free low-carb chicken rosemary
Ingredients (4-5 cups)
  • 1 cup cooked, chopped chicken
  • 2 teaspoons chopped fresh rosemary, plus more sprigs for garnish
  • 3/4 cup seedless grapes, halved
  • 1-2 green onions, chopped (depending on taste)
  • 1/4 cup slivered almonds, toasted (divided use)
  • 1/4 cup nonfat Greek yogurt
  • 1 heaping tablespoon Lemonaise (or light mayo)
  • 1 teaspoon Dijon mustard
  • pinch cayenne pepper
  • salt & pepper, to taste
  • 4-5 large pears or apples
  • 3-4 lemons
  • water
  • butter lettuce
Instructions
  1. Mix together yogurt, Lemonaise, Dijon mustard, and rosemary. Add chicken, grapes, green onions and half of the almonds. Stir until combined. Season with cayenne, salt and pepper (to taste).
  2. Add the juice from 3.5 lemons to a large bowl of cold water. Cut the top off the pears or apples. Squeeze a little lemon juice on the exposed portion from the remaining half lemon. Using a melon baller, quickly hollow out the pear and place in the bowl of lemon water. If fruit does not sit upright, cut off a small portion on the bottom as well (and coat with lemon juice).
  3. When ready to serve, scoop chicken salad into the "cups" and place on a platter lined with butter lettuce and garnish with a small sprig of rosemary. Top with remaining almonds and serve!
Powered by Recipage

S is for: Strawberry Balsamic Rosemary Ice Cream

To contact us Click HERE
Before you scrunch your nose up questioning this combination of flavors, hear me out. This is the best strawberry ice cream you'll ever have. Hands down. For those of you who have had the pleasure of sampling the balsamic strawberry ice cream at Bi-Rite in San Francisco, you probably don't need much convincing.

The balsamic is subtle, and it really brings out the bright flavor of the strawberries. As for the rosemary, that was a last-minute add, and I feel like it really stepped up this ice cream's game. I'm already a fan of using fresh herbs along with fruit in desserts. My first thought was actually to use basil, but I already had some rosemary on hand after making the Rosemary Chicken Salad last week, so I decided to use that instead. Don't worry, you won't be crunching down on actual rosemary. Instead, I infused the herb into the custard base, creating an ever-so-slight-but-delightful rosemary finish.


Let's start with the strawberries. I believe Bi-Rite cooks the strawberries on the stove for their version, but I love roasting fruits and vegetables, so I did that instead. I also think it helps to further remove some of the water in the strawberries, which can make for "icy" ice cream. The sugar will also help with this, along with preventing the strawberries from getting too hard. I've also read you can add a tablespoon of vodka or kirsch to help with this issue, but I totally forgot so I added it as an optional ingredient below.


Hull and slice the strawberries and then place them on a baking sheet lined with foil. Mine were pretty sweet already, so I only used 2 tablespoons of sugar. I also drizzled 1 tablespoon of balsamic vinegar over the top and let them sit to macerate for about 15 minutes. Then I popped them into a 425 degree oven for another 15 minutes. If you like chunky ice cream, mash with potato masher. If you prefer a smoother ice cream, puree in a blender or food processor. Cool and place berries and accumulated syrup into a container (along with vodka or kirsch, if using) and refrigerate.


To make the ice cream base, I decided to do a custard, which calls for egg yolks. You can definitely make ice cream without them, but I feel like it makes it more rich and decadent. And come on, if you're going to eat ice cream, do it all out! Speaking of which, I feel like there are differing opinions on the ratio of cream to milk to use. Several recipes call for 2 cups heavy cream, and 1 cup whole milk. Some call for a 1:1 ratio. Just remember that the more cream & egg yolks (translation: fat) you use, the creamier the ice cream. However, this time, I went with 2 cups of Strauss cream, and 1 cup half and half. I thought it was perfect...but use whichever combination you desire. (Was that confusing? Hopefully I made sense there).


Heat cream, half and half, sugar, salt and rosemary on the stove until very hot, but not boiling. Whisk egg yolks in a separate bowl and add about a 1/2 cup of the warm mixture into the eggs while whisking. This will help "temper" them so they don't scramble. Return egg mixture to the pan and cook, stirring constantly, until mixture is thick enough to coat the back of a spoon.

Remove rosemary and strain. Stir in vanilla extract. If you pureed your strawberries, you can mix these now as well, otherwise, leave them separate. Refrigerate for at least four hours or overnight. It's very important that both the custard and the strawberries are very cold before putting them in the ice cream maker.


Freeze in an ice cream maker according to manufacturer's directions, adding the strawberries during the final five minutes (unless you pureed them). Enjoy immediately if you prefer a "soft serve" consistency, or freeze for an additional couple hours for more traditional ice cream consistency. Garnish with additional strawberries and get ready to enjoy the best strawberry ice cream of your life!

Strawberry Balsamic Rosemary Ice Cream
by Jaymee SireKeywords: dessert strawberry balsamic vinegar rosemary ice-cream
Ingredients (1 quart)
  • 1 pint strawberries
  • 2-3 tablespoons granulated sugar (depending on how sweet your strawberries are)
  • 1 tablespoon balsamic vinegar
  • 1 tablespoon vodka or kirsch (optional, but recommended)
  • 2 cups heavy cream
  • 1 cup half and half
  • 3/4 granulated sugar (use a little more if you like really sweet ice cream)
  • 1 large sprig of fresh rosemary
  • pinch of sea salt
  • 4-5 egg yolks
  • 1 teaspoon pure vanilla extract
Instructions
  1. Pre-heat oven to 425 degrees. Hull and slice the strawberries and then place them on a baking sheet lined with foil. Sprinkle with 2-3 tablespoons of sugar and balsamic vinegar and let them macerate for about 15 minutes. Roast in oven for 10-15 minutes. If you like chunky ice cream, mash with potato masher. If you prefer a smoother ice cream, puree in a blender or food processor. Cool and place berries and accumulated syrup into a container (along with vodka or kirsch, if using) and refrigerate.
  2. Heat cream, half and half, sugar, salt and rosemary on the stove until very hot, but not boiling. Whisk egg yolks in a separate bowl and add about a 1/2 cup of the warm cream mixture into the eggs while whisking. This will help "temper" them so they don't scramble. Return egg mixture to the pan and cook, stirring constantly, until mixture is thick enough to coat the back of a spoon.
  3. Remove rosemary and strain. Stir in vanilla extract. If you pureed your strawberries, you can mix these now as well, otherwise, leave them separate. Refrigerate for at least four hours or overnight.
  4. Freeze in an ice cream maker according to manufacturer's directions, adding the strawberries during the final five minutes (unless you pureed them). Enjoy immediately if you prefer a "soft serve" consistency, or freeze for an additional couple hours for more traditional ice cream consistency. Garnish with additional strawberries and enjoy!
Powered by Recipage

S is for: Sushi Zone {Restaurant Review}

To contact us Click HERE
As I was sitting at work on Tuesday night, a reminder popped up on my phone for the next day: "Sushi with Sachi."

Sachi and I made these plans the previous week after indulging in a few adult beverages, so I sent her a text asking if we were still on. She immediately responded: "Most definitely still on. 5PM, table for two."

I haven't known Sachi too long, but this is precisely why I love the girl. She's up for anything. A sushi outing at 4:45 in the afternoon with someone she barely knows? Sign her up.

Let me also say that Sushi Zone has been on my "list" for ages. And considering my gripe about the lack of abundant sushi restaurants in this town, I can't believe it's taken me this long to try it.


Now if you're wondering why on earth we were eating dinner at 5PM, we had our reasons. For starters, I had a kickball game to play in at 6:30. (Kickball is actually how I initially met Sachi, but sadly she is not playing this season). Also, check out the photo on the left. That is the line that had already formed FIFTEEN MINUTES before the place even opened. That's because the place is *tiny.* It contains two booths that cozily would fit 6 people each (but 4 realistically). Aside from that, it's just the sushi bar, which has room for 8. There is one waitress, one sushi chef, and one bus boy. In other words, if you do not get in on that very first seating, be prepared to wait at least an hour and usually more. (Sachi waited 3 hours the first time she ate there).

Since we wanted to get our food as quickly as possible, we were determined to be one of the first in the restaurant to order. We literally just started rattling random things off the menu to the friendly waitress. We ended up ordering two appetizers, three plates of sashimi, two rolls and some sake. (We were hungry, OK?!?) Fortunately, we realized we had over-ordered before the sushi chef made the final roll and promptly un-ordered it. We loved the Hawaiian Roll #1. It was tuna, avocado and scallions topped with macadamia nuts. Not sure I've ever had nuts on a sushi roll, but I loved the crunchy texture, and they went beautifully with the fresh fish and avocado. (For the record, Hawaiian Roll #2 with mango instead of avocado also was tempting).


More on the amazing sushi in a minute, but we also ordered a couple of hot dishes which we adored. The one on the left is a must-order item here. It's bass baked inside of mussel shells with chunks of mango and mixed with a spicy mayo sauce. Ummmm....yes please. (They also have a baked mussels dish that looked to be very similar.) This was the first thing from our laundry list order that arrived, and I'm pretty sure we devoured it in about 2 minutes flat. We also ordered the Hamachi Kama (cheek) off the specials board. This is also a cooked dish, and it was flaky and light. It was a little challenging at times to pry the fish off the bone with chopsticks, but it was delicious nonetheless and I would definitely recommend (and a steal at only $8.50).


But for me, the real measure of a good sushi joint is the quality of the sashimi, and it truly shines at Sushi Zone. In our ordering frenzy, we chose mackerel (left), tuna, and salmon. Just looking at it on the plate you knew it was going to be awesome. First of all, they are extremely generous with their sashimi cuts here. I mean....just look at it! Huge chunks of some of the freshest fish I've ever laid taste buds upon. Seriously. So. Fresh. I hate when fish tastes...well, for lack of a better word...fishy. I also hate when it's chewy or has a weird texture. You'll find nothing of the sort at Sushi Zone. The fish we had there was almost...buttery. It sort of just melted in your mouth as you do that close-your-eyes-and-go-mmmmm face. I had never tried mackerel before, but it is my new favorite sushi now.

The other great thing about Sushi Zone? The prices. Most rolls are under 10 bucks (even the fancy ones). The sashimi plates will only run you $12 each, and most of the appetizers were under $10 as well. (Just beware...cash only). Our total came to $72. Not too bad for two hungry girls craving some delicious sushi and girl time. Cheers to the sushi and Sachi...and to many more culinary adventures in our future!

S is for: Sriracha Shrimp Cocktail

To contact us Click HERE
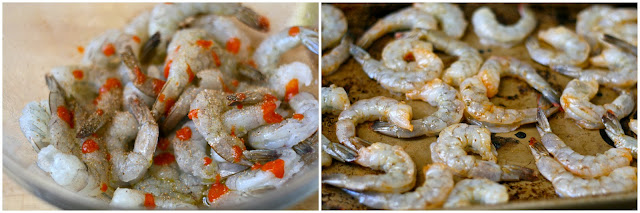
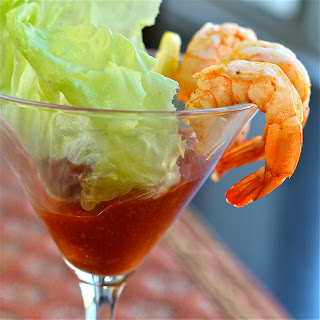
One of my favorite Twitter threads recently was when I tweeted this: "Sriracha + ranch dressing = Mind. Blown." I really was just so excited to share my new revelation with the world. I had no idea it would elicit the sort of response that it did. Replies came pouring in about everyone's favorite use for the spicy condiment.

Sriracha mayo, Sriracha on nachos, Sriracha on eggs, Sriracha meatloaf, and one of my favorites: Sriracha ketchup. (And did you know there's even a Sriracha cookbook?!) So when "S week" rolled back around I knew I had to do something with the beloved "Rooster Sauce."

Since I'm already a fan of mixing it with ketchup, cocktail sauce seemed like a genius idea. I also incorporated it into the seasoning for the shrimp as well...creating a spicy new twist on the popular appetizer.


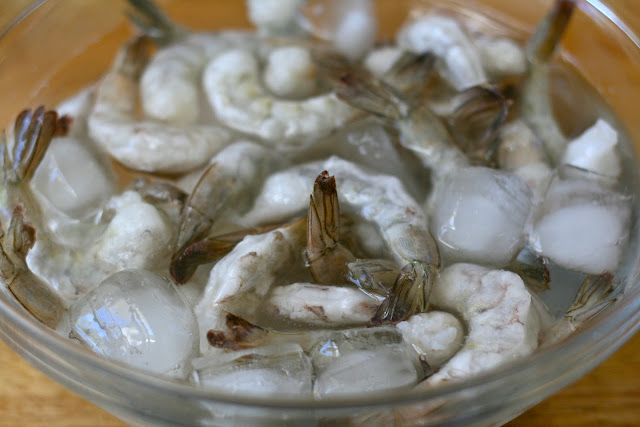
I always keep a bag of frozen, raw shrimp from Costco on hand in my freezer. They are easy to defrost and can easily be used in a quick weeknight meal. My only complaint is sometimes they taste like they've been frozen. For this reason, I was intrigued by Alton Brown's suggestion for doing a quick brine before cooking his cocktail shrimp. This sort of sounded redundant to me...I mean, after all, don't the little guys swim around in brine their entire lives? I was willing to try. Alton recommends using equal parts of sugar and salt in some ice water for about 25 minutes.


Once time is up, rinse and pat the shrimp dry with paper towels. Preheat a sheet pan under the broiler. Toss shrimp with a little oil, sriracha, lemon juice and sprinkle with some Old Bay seasoning. (My new habanero olive oil was perfect here). Spread in a single layer onto the sheet pan and broil for two minutes. Turn the shrimp over with tongs and broil for an additional minute or until shrimp are opaque. Be careful not to overcook!


Transfer to a chilled plate and cool in the refrigerator. I couldn't resist taste testing one of them to check out if the bribe really did anything. I was shocked! It really did help. The shrimp were plump and "popped" in my mouth much like a super fresh one would.


As for the cocktail sauce, I basically just doctored up my normal recipe by adding sriracha and using lime juice instead of lemon. Mix up the ketchup, sriracha, horseradish, Worcestershire, lime juice and salt in a bowl. Adjust amounts and seasonings to suit your own personal tastes. Chill until ready to serve.


If you want to get all fancy, serve the shrimp in martini glasses with some sauce and garnish with a leaf of butter lettuce and a wheel of lemon. (Of course, it's perfectly acceptable to just serve on a platter too.) I loved this sriracha recipe and will definitely be making it again. What's your favorite use for sriracha?

Sriracha Shrimp Cocktail
by Jaymee SirePrep Time: 5 minutesCook Time: 3 minutesKeywords: appetizer sriracha shrimp cocktail sauce seafood
Ingredients
    For the brine (adapted from Alton Brown)
    • 1/4 cup kosher salt
    • 1/4 cup sugar
    • 1 cup water
    • 2 cups ice
    For the shrimp
    • 30 raw, tail on shrimp (cleaned and deveined)
    • 1 tablespoon olive oil
    • 2-3 teaspoons Sriracha
    • Juice from 1 lemon
    • Old Bay Seasoning
    For the cocktail sauce
    • 1 cup ketchup
    • 1-2 tablespoon prepared horseradish (depending on how spicy you like it)
    • 2-3 teaspoons sriracha (again, depending on how spicy you like it)
    • Juice from 1/2 lime
    • Dash Worcestershire
    • Pinch salt
    Instructions
    1. Combine ingredients for brine. Place cleaned shrimp into a bowl with brine and refrigerate mixture for 20 to 25 minutes.
    2. Place a baking sheet under oven broiler and preheat for 5 minutes. Remove shrimp from brine and drain. Rinse under cold water and dry on paper towels. In a large bowl, toss shrimp with olive oil, Sriracha, lemon juice and sprinkle with Old Bay seasoning, if desired.
    3. Place shrimp onto a sizzling sheet pan and return to broiler immediately. After 90 seconds or so, turn the shrimp with a pair of tongs. Return the shrimp to broiler for 60-90 seconds. Transfer to a cold platter and refrigerate immediately.
    4. Combine ingredients for cocktail sauce and adjust any amounts to suit your tastes. Refrigerate until ready to serve. Serve shrimp with cocktail sauce.
    Powered by Recipage